
- DIY Room Dividers Maximize Space and Privacy-Room dividers instantly make something out of nothing, turning single-use rooms into double spaces with separation and privacy. They can even create the illusion that a room has more square footage.Some room dividers can be built with such substance and sturdiness that they serve nearly the same function as interior partition walls. But it’s more typical to scale down the divider—because when you are doing it yourself, who wants to make things complicated? For DIY room dividers, put your carpentry and drywall skills on the back burner. Instead, think along the lines of simple tools and easy-to-handle materials. For tools, staple guns, hot glue, hammers, and finish nails tend to be the norm. For materials, almost anything is fair game: rope, license plates, plastic pipe, chicken wire, repurposed IKEA doors, pallet wood, vinyl records, and metal. Or just about anything else you can dream up.
- Simple Jute Rope Room Divider-What better room divider for an upholstery collective than one made of organic fibers? Morgan Satterfield, who loves remodeling her mid-century modern home near Palm Springs, has a friend who offers upholstery classes in a giant warehouse, and that warehouse was just too big. Adding a divider near the door was the perfect way to soften this cavernous space.This DIY room divider is dead-simple, easy to realize, and the materials are cheap. Thick jute rope, available at hardware and craft/hobby stores, is very inexpensive. And if you are willing to go with thinner 1/16-inch jute rope, costs drop even more.Mount wooden shoe plates on the floor and ceiling, then thread the rope between the plates. While this project won’t create a total visual block, it is superb at demarcating and separating spaces.
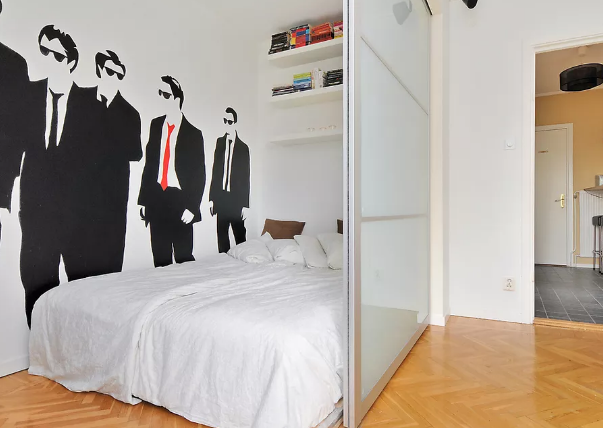
- Frosted Glass Room Divider-Studio apartment dwellers know how cabin fever can develop: Something about having just one room really cranks up the claustrophobia. It intensifies when two people dwell in that same single room. Can this be fixed?Where there is a need, there is always an IKEA hack. Jules Yap, the founder of the popular blog, IKEA Hackers, relates the solution that one of her readers hit on. The idea is to cut the room into two parts with a sliding wall.IKEA PAX wardrobe doors with frosted glass come in sizes large enough to stretch from ceiling to floor. They slide effortlessly on tracks and, like a just-sharpened knife, slice one chaotic room into two separate calm sanctuaries.
- Free-Hanging Divider Wall -If you want a DIY room divider that is easy to put together, look no further than this one. Jennifer Eckert over at the design blog Fresh Crush was mainlining genius when she dreamed up this fabric-covered room divider, hitting every DIY sweet spot there is.For one thing, this divider is cheap. Jennifer pulled this one in for less than a couple of hundred dollars for two panels. And of course, it is DIY-friendly. The complete list of tools and materials she used: drill, bit, pencil, measuring tape, ceiling hooks, adjustable connectors, hurricane tape, hammer, staple gun, staples, and safety glasses. Those adjustable connectors attached to the ceiling allow for easy vertical adjustment and make this a very flexible design.This divider is out-of-the-box fast because the fabric is stretched over pre-built artist canvases, each one measuring 30 x 50 inches.
- Book Heaven -A classic DIY room divider is one that has found its way into college dorms and other shared spaces for decades: the carefully positioned bookcase. This is one IKEA hack that is more about placement than it is about drills, screws, and saws. All you have to do is rotate a shelving unit so that it is perpendicular to the wall.It’s important, though, to secure the unit so that it can’t tip. This doesn’t just apply to earthquake-prone areas; it is necessary everywhere, and especially in homes with active children. IKEA provides free tip-over hardware restraint kits, but these don’t work when the shelving unit is positioned at this angle. Instead, use solid restraints, such as metal L brackets attached to a wall stud and to the top of the unit. Supplement this with screws driven through the side of the unit, directly into the same stud. Screw heads will be visible, but you can cover them with tiny plastic white screw cap covers. Anchoring the bottom of the shelving unit to the floor will also help reinforce it.
- Chain Mail Divider-You might be excused for thinking that this DIY room divider looks like fabric. Except it isn’t. Instead, this is a coiled metal wire mesh that drapes and hangs just like fabric. Oregon’s Cascade Coil made this room divider for a Hyatt Hotel. But do-it-yourself makers can purchase metal coil products directly from the company and make wonderful things.
- Exposed Lath Room Divider-Anybody who has ever taken a sledgehammer to a plaster wall knows the distinctive, beautiful strips of wood that emerge from the dust once the plaster surface is removed. These are the lath boards. In traditional construction, lath was nailed to the studs and acted as a base for the wet plaster coating.The family-run collective The Brooklyn Home Company created a unique room divider out of the lath boards from a plaster-and-lath wall. This room divider wall pays homage to the roots of this old Brooklyn, New York duplex.
Source: The Spruce
Collected and published by Arms &McGregor International Realty® editorial team. Get in touch with us at [email protected]